Last month I touched on styling your photos and telling a story through your image. Selling your idea to the viewer is key to creating a great shot, but idea’s and styling alone won’t always be enough. Photography is a creative process in its self and we are using it to express our own art. Ultimately we need to invest in a professional photographer and studio time, to get the best shots we can, but there are some simple tricks you can start with to creating illusions and enhancing your subject with light and colour.
Using Colour to enhance your photo
Colours affect moods, and you can use it creatively in your images to add tension or relax the viewer. Colours will affect the emotional impact of your photos so be aware of what message you’re trying to convey, for example yellow is associated with happiness but orange can move us to sadness.
Warm up the image with a redder pallet, blues and greens are cooler. Red is also the universal colour of warning so use it with caution, small amounts in a photo can be very effective. To add tension and drama use contrasting colours like reds and greens or yellow and purples, alternatively using the shades of the same colour will give a sense of harmony.
Black and white can be used to create more atmospheric shots as they are more dependent on shape and form to create the interest. You can experiment with the high and low contrasts to increase the drama, adding more black or white changes the feel of your image.
MOODS AND COLOURS
Blue - peace, tranquility, calm, stability, harmony, unity, trust, truth, confidence, cleanliness, order, sky, water, cold, Peaceful, tranquil.
Black - power, sexuality, sophistication, formality, elegance, wealth, mystery, fear, evil, anonymity, unhappiness, depth, style, evil, sadness, anger, technical color.
Green - nature, environment, health, good luck, renewal, youth, vigor, spring, generosity, fertility, jealousy, inexperience, envy and misfortune.
Purple - royalty, exotic, wealth spirituality, nobility, ceremony, mystery, transformation, wisdom, enlightenment, cruelty, arrogance, mourning.
Red - with love, valentines, danger, desire, speed, strength, violence, anger, emergency, blood and excitement.
White - reverence, purity, simplicity, cleanliness, peace, humility, precision, innocence, youth, birth, winter, snow, good, sterility, and marriage.
Brown- Solid, reliable, sad, wistful. Light brown implies genuineness while dark brown is similar to wood or leather.
Yellow - joy, happiness, optimism, idealism, imagination, hope, sunshine, summer, philosophy, dishonesty, cowardice, betrayal.
Lighting and using your flash

Digital photography is easy when you have plenty of light and conditions are ideal. To avoid disappointing results it is wise to use the light available to us in each shot.
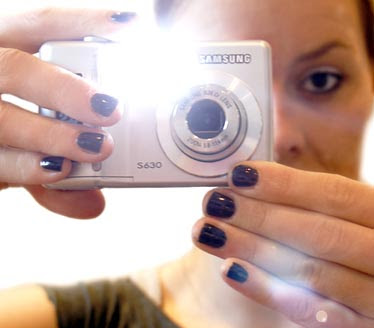
So what happens when we don’t have the natural light? Flash photography is a wonderful thing as it allows you to take photos in all manner of places adding artificial light, but there are advantages and disadvantages of doing this. The most common problems are the harsh shadows on or behind the subject produced by over exposure to unnatural light, the atmosphere and emotion of your shot is tainted and your digital image can flatten out. 99% of compact digital cameras come with a built in flash which lights the subject from the front therefore compressing the depth of the photo. You need to start watching how light falls on your surroundings and you will learn what works with a flash and what doesn’t.
Professionals generally have flashes which are detached from the camera on a hotshoe or flash bracket, they can position the flash in the correct place utilizing and benefiting from this function, however we are not professionals and just want to take a simple shot to show off our nails. Here are some top tips to making your flash work for you;
Get in close - the main limitations of the built in flash units is the power they use, external flash units have a dedicated power source giving you a bigger and brighter light, however the compact cameras share its flash power with the other components. If you’re going to use the flash get in really close and let the flash have an impact. This will also eliminate the additional shadow you will see, if you’re taking a picture from some distance turn the flash off and let the camera adjust its shutter speed to compensate for the light.
Diffusing the light – another limitation of the built in flash unit is the harsh results they produce, and the ambient scene is lost, this is because the light which is produced by the flash can’t be directed and it bounces off the surface of the subject. You can soften the light the flash produces by diffusing it. Using white card in front of the flash so that it bounces up or sideways, or placing a small amount of semi opaque sticky tape over the flash light which will softening it. Stuart Dibben from SJD photography says “ when I first started out I would use plastic take away boxes and make an elaborate diffuser with tissue and cellophane”.
Don’t just use the flash when it is dark, flash is great outdoors and can really lift the image, especially if your subject has strong backlight or harsh downlight. It will light up the shadowy areas.
Reflect the light – while the diffuser sits directly over your flash the reflector is usually some kind of white object (card paper or plastic) that will bounce your flash in order to spread the effects, making your flash light a little less direct. This
will go some ways to eliminate harsh light, shadows and help to soften the picture. Using something as obvious as a white t shirt will double the natural light.
Be aware that if you use anything with a colour the image will be tinged with that colour. Again this can work in your favor, for example gold will give a natural sunny effect.
Using Macro

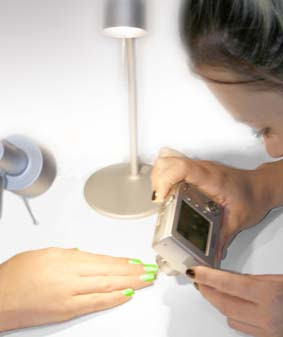
While using your compact camera on the standard setting you can see much more detail by using the macro, this changes the focus of the camera and you will be able to take an image just a few inches away. Using the macro setting will improve your ability to see small details and virtually all digital cameras today have this setting which is usually denoted by a symbol of a flower. Taking a close up of an image is simple but light can be an issue. You can avoid casting shadow and restricting light by using the zoom. It is important also to keep the camera steady, as the slightest movement will show up on the shot. You can take some am1azing close ups with the help of some simple items you have at home. With a bit of ingenuity you can create some really professional looking photographs without spending a fortune on complicated equipment.
Geoff Brown from Blue Light Media tells me that “The secret to a good macro shot is lighting”. Although you can buy special macro photography kits you can also achieve superb results using two desk lamps. You need at least two for even illumination, causing minimum glare and shadow to your nails. Both lamps should have the same wattage and be positioned at equally on either side of the subject, make sure the lamps and your camera do not cast shadow over the area your shooting.
If the object you’re shooting is reflective, like shiny nails, jewels and gems stones, then angle the lamps so that they are low, around 30 degrees from the horizon, any higher could result in glare being reflected into the camera.
The trick about taking a good macro shot is choosing the right subject in the right environment. It is best if you keep it simple an uncluttered background won’t detract, or make it difficult for the camera to focus and expose the picture correctly. The macro setting maximizes your camera’s exposure control and helps ensure the image is captured with the right amount of light so that it doesn’t appear too dark, or light.
Now that you have the basic knowledge to achieve your photo’s in the right light, follow these simple exercises and send the images to info@sambiddle.co.uk for feedback. Stuart Dibbon from SJD Photography will also look at your images.
Set up your shot using the steps in last month’s tutorial and take 4 photo’s using the following methods to light up your nails.
Candle light
Day light
Desk light
Flash light
Watch how shadow effects your image, how the mood changes and how this effects the design of your shot.
EXERCISE 2 – Lighting
Using the method outlined above take a close up shot of one nail.EXERCISE 3 – Macro
Based on Sam Biddle’s photographic workshop this tutorial will help technicians who want to illustrate their designs and share them with others. The workshop offers an in-depth and practical solution to learning some simple techniques and skills, utilizing the expertise of Stuart Dibben from SJD Photography, Stuart is based in South West England. http://sjdphotography.photium.com/. List of workshops are available on http://www.sambiddle.co.uk/ or contact Sam on info@sambiddle.co.uk.

This two part master class was published in Scratch Magazine 2008


